Content
Where to view and access existing documents
How to create and store templates
Introduction
 The Content Generation feature allows a user to create and review AI-created, brand specific content. To start creating content log in to EasyTranslate and navigate to the section Content Generation in the menu bar and expand the view by clicking on the arrow. From here you can manage the creation of new documents (Plain Document), view and access existing content (Documents) and create and save templates for your next projects (Templates).
How to create new content
To get started go to the Plain Document section where you can create new documents and start generating content for your newest project.
The left side panel features the basic and advanced generation settings. The right side includes the workspace and offers the opportunity to add content reference.
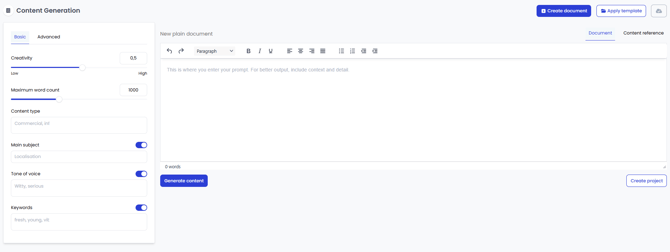
Generation settings:
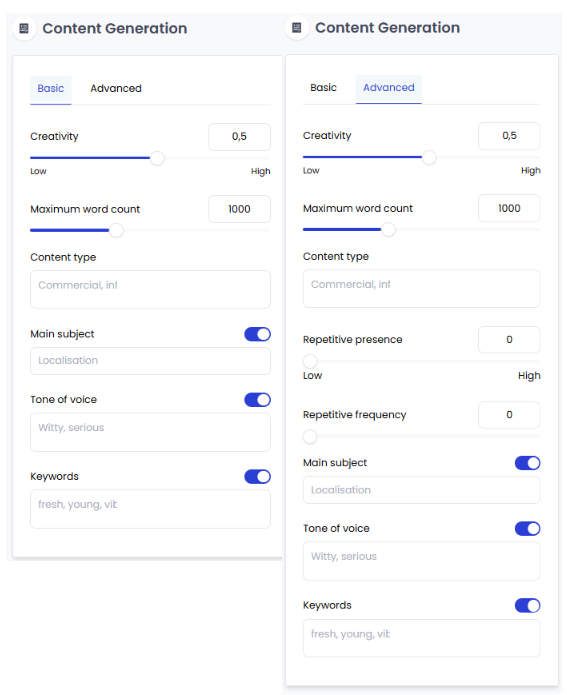
Before generating new content, go to the settings panel on the left to define the parameters used by the system for aligning the output with the desired purpose, style, and tone of voice. In the Basic tab, you can set the creativity level and the maximum word count, as well as define the content type, main subject, desired tone of voice, and keywords. Under the Advanced tab, you can additionally set Repetitive presence and Repetitive frequency to define how strongly the content generation feature avoids repeating previously mentioned content.
Creativity: This feature allows you to determine how creative you want the output to be. Setting it to Low ensures the model adheres strictly to your prompt, while higher values grant the system more creative freedom.
Maximum word count: This setting allows you to determine how long you want the output to be. The system will try to adhere strictly and might cut off a sentence. Depending on other settings, it will add a few more words to accommodate all content.
Content Type: Specify the type of content you want to generate, such as a newsletter, a product description, etc.
Main subject: What is your content about?
Tone of voice: What tone would you like the output to adopt?
Keywords: The system includes any keywords you add to help generate exactly the expected output.
Repetitive frequency: It sets the positive values to penalise new tokens based on their existing frequency in the text so far, decreasing the model's likelihood to repeat the same line verbatim
Repetitive Presence: This parameter encourages the model to make novel predictions. The presence penalty lowers the probability of a word if it has already appeared in the predicted text. Unlike repetitive frequency, the presence penalty does not depend on how many times a word has appeared in past predictions.
Workspace and workspace settings:
The workspace is divided into 2 tabs, Document and Content reference.
The Document tab is where you interact with the tool to create new content. Simply add your prompt to the text field click on Generate content and it will produce the desired output. The working title of all newly created documents is New plain document and we recommend renaming it for easy organisation.To do so click on New plain document and give it a new name in the dialog.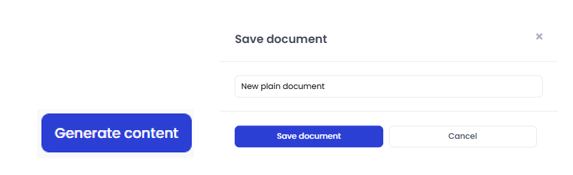
In the Content reference tab you can provide the tool with reference material to work with. The tool is connected to the translation memories (TM) associated with the respective EasyTranslate account. When content reference is provided, we use it to find semantically similar TM matches in the database for the given account, and use the data to further drive style and tone of voice. This is repeated every time when content reference is provided.
Good to know:
-
Providing content reference has a direct influence on the created output.
Once a project is done, you can generate a new blank page to work with by clicking on the Create Document button on the top right corner. This action also resets your template and settings. You can re-import a previously saved template to use with the blank document by clicking on Apply template. Please see the section on template creation HERE for details. While you work on your content we make sure to autosave all your inputs. Whenever the cloud icon turns green the newest data is saved.
![]() When your content is generated click on the Create project button to automatically create a Copy Editing task. A copy editor will be assigned to give the content the finishing touches. Once your content creation project is completed, you can use the layout bar to personalise its style.
When your content is generated click on the Create project button to automatically create a Copy Editing task. A copy editor will be assigned to give the content the finishing touches. Once your content creation project is completed, you can use the layout bar to personalise its style.
Good to know:
-
In order to use the copy editing services you need to add a copy editor to your freelancer pool.
Where to view and access existing documents
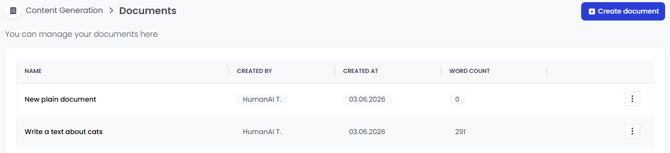
You can find a list of all your created documents by clicking on Documents in the sidebar. It provides an overview of all documents, and details such as who it was created by and when. From here you can click on Create document to start a new project. This will automatically take you to the Plain Document view. You can rename or delete documents at any time by clicking on the three dots on the right side.
Warning:
-
Deleting a document is irreversible, so be sure you really no longer want to keep it.
How to create and store templates
Templates are a great time saver when you regularly need to create content with the same settings. Simply click on Apply template during content generation to apply any of your pre-existing templates. The Templates section stores all your templates for easy management. It provides an overview of all templates and details such as who it was created by and when.

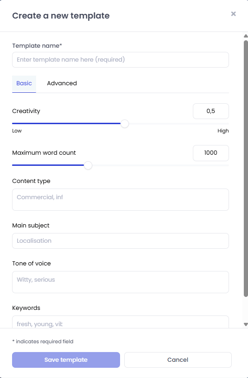
Click on Create template on the top right to define a new customised and reusable setup. In the dialog, give the template a name and fill in all the content generation settings in both tabs (for details see HERE) and click Save template.
 You can edit the template at any time by clicking on Right next to the dots, you can choose to Edit template. This will take you to the template for editing. Click on the three dots to rename or delete a template.
Warning:
- Deleting a template is irreversible, so be sure you no longer want to keep it