Content
Part 1
Translation Memory
Creating a new translation memory and importing existing TM data
View and/or edit an existing translation memory
Vector Space: Translation Memory and HumanAI
Part 2
Glossary
Creating a new glossary and importing existing glossary entries
View and/or edit an existing glossary
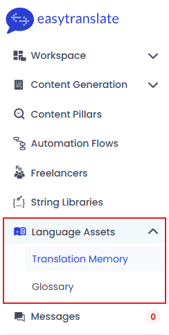
The EasyTranslate platform gives you the possibility to view and modify the language assets available in your account. To access the data log in to EasyTranslate and navigate to the section Language Assets in the menu bar. From here you can manage both your translation memories (TM) and glossaries. You have the possibility to create new assets, search for existing translations and terms, add or delete content and much more.
Good to know:
- Changes and updates to your translation assets in general and the translation memory in particular can directly impact the HumanAI output. Therefore, we strongly recommend you reach out to your AI training specialist for advice and guidance before making changes.
Part 1
Translation Memory
Overview
Your translation memory stores previously translated segments together with their source equivalent. It is used to pre-populate new projects with previously translated sentences, phrases etc. to ensure consistency and to improve efficiency. Also, in a HumanAI workflow the translation memory plays a central role in making sure the output follows your specific requirements for style and tone of voice.
To learn more about the use of translation memories with HumanAI go to the section Vector Space: Translation Memory and HumanAI further down in this document.
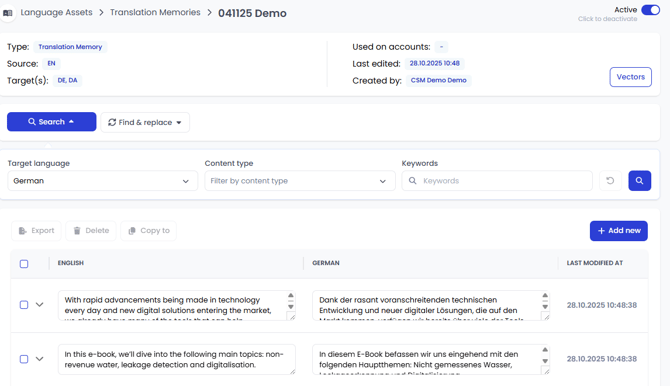
Click on Translation Memory in the side bar to see a list of all available TMs in your account. You can use the Name filter to find a specific TM or the Source language and Target language filter to search for a TM with a specific language or language combination. Each entry displays information about the asset: name, source and target languages, the specific workflows the assets are connected to as well as creation and last edit date.
Creating a new translation memory and importing existing TM data
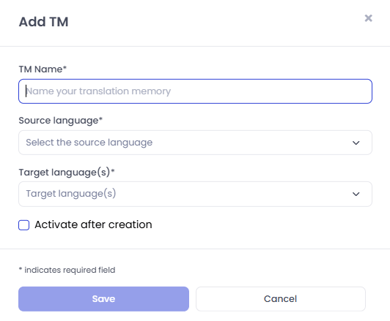
By clicking the Create new button in the upper right corner, you can create a completely new translation memory. If needed you can create multiple TMs which can be useful if you would like to use separate TMs for different purposes. Add the necessary information in the dialog box, make sure you activate it and click Save.
Good to know:
- Translation Memories need to be connected to the workflow(s) you intend to use them with. Please reach out to your customer success manager or the support team via the website chat if you have any questions. Learn more about workflows and their setup HERE.
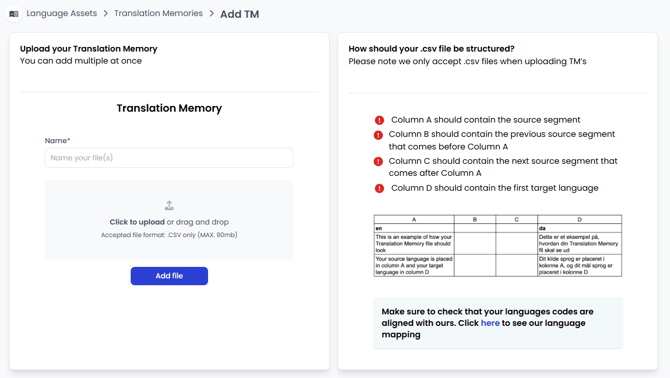
It is also possible to import a .csv file with already existing translation memory data by clicking the Import new button. A guide detailing the required .csv file structure is available in the dialog box.
View and/or edit an existing translation memory
To view and/or edit the content of a specific translation memory click on the three dots on the right side. This will open a list with options to manage your asset: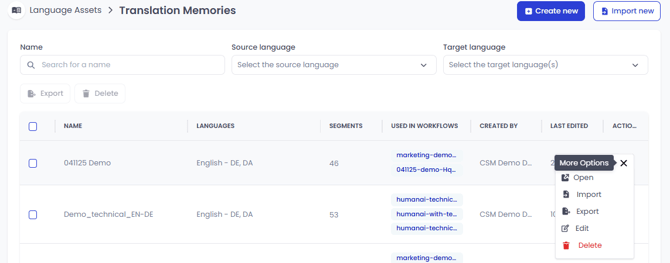
Open: This option offers a range of editing possibilities to keep your TM up to date (you can also open this view by clicking on the name of the TM). Start out by filtering for the language pair you would like to have displayed. If you are using HumanAI you additionally have the possibility to distinguish between Human and Synthetic segments (Synthetic=created by AI without human involvement). Finally, you can filter to display segments containing a specific keyword or content only.
After applying the filters, make the desired changes. When you’re finished, save them by clicking the cloud icon in the footer. The icon will turn green to confirm that your edits have been saved.
The editor offers the following options:
- Export specific segments: check one or more segments and click Export. Choose an email address you would like the export (.csv) to be sent to.
- Delete specific segments: check one or more segments and click Delete. Confirm the deletion in the dialog box
- Copy segments to a different TM: check one or more segments, click on Copy to and choose the asset(s) you want to copy the content to in the dialog box and confirm.
- Edit any given segment: change source and/or target content of any given segment.
- Deactivate the TM: temporarily deactivate the asset by toggling the switch in the upper right corner. The status will change to Inactive. This setting can be reverted at any time.
- Add new entries: clicking the button Add new will open a dialog box. Fill in all requested information and save. The segment is now added to the TM.
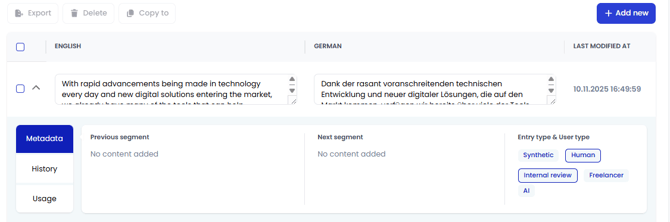
To access more information about a given TM entry click on the small arrow next to the tick box on the left side of a segment to expand the view:
- Metadata: the Metadata tab provides information about Context as well as Entry & User Type of a given segment. The latter can be adjusted as needed by clicking on the respective option.
- History: if you are interested in details about past updates of a specific segment the History tab provides more information.
- Usage: the Usage tab provides you with the Project-ID(s) indicating in which project(s) the segment was used before.
- Import: If you have more than just a couple of segments you want to add to your existing TM you have the option to upload additional content via a .csv file, which needs to follow a specific format (see Creating a new Translation memory and importing existing TM data for more info). Once your file is ready, upload it in the dialog box and click Confirm.
- Export: use this option to start the download of a TM and have it sent to an email address of your choice.
- Edit: use this option to edit the name or hide languages in a TM. By removing a language it gets deactivated and hidden. This setting does not delete the TM from the system and it is re-activated once the language is added again.
- Delete: Use this option to delete the entire TM from the account. Note that this action cannot be reversed and we recommend downloading a copy before proceeding.
Vector Space: Translation Memory and HumanAI
The translation memory is an important part of your HumanAI setup as it has a direct influence on the translation output created by your customized AI models.
To access the visualisation of your TM data open the TM and click on Vectors in the top right corner. The Embedding Projector visualizes the multidimensional space in which each dot represents segments of your TM. The closer the dots (neighbours) are to each other the more similar their value, i.e., dots within a cluster have semantically similar content. Every time new content is translated, existing TM data is retrieved via RAG methodology and used to output semantically similar text. Hence it is very important to use carefully selected content to set up your customized systems and to properly maintain it. New segments are added to the vector space every time a project is completed. Also, updates to existing translations will further improve the data set over time. The goal is to produce a space with one or more clearly distinct clusters of semantically related segments for best results.
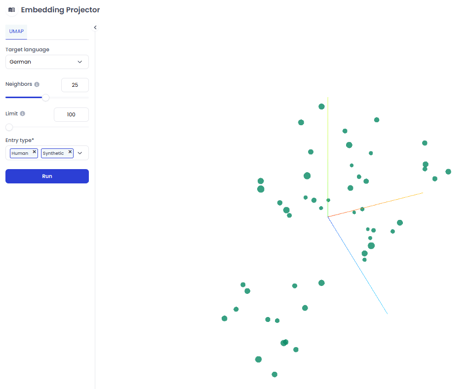
Neighbours: you can set how many “neighbours” we show for each segment.
Limit: you can choose the amount of segments included in the visualisation. The maximum is 10.000 segments . The minimum is 100 segments, therefore you will only be able to see this visualisation if the TM contains 100 segments or more (per language)
Entry type: Choose between Human and Synthetic segments.
Part 2
Glossary
Overview
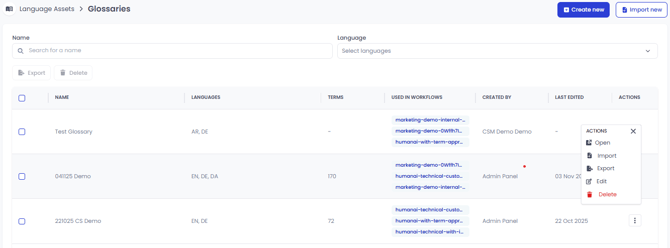
A glossary is a list defining how you prefer terms to be translated in a specific language. If you have mandatory translations for some of your terms, or wish that certain terms do not get translated at all, it is highly recommended you create a glossary. Click on Glossary in the side bar to see a list of all available glossaries in your account
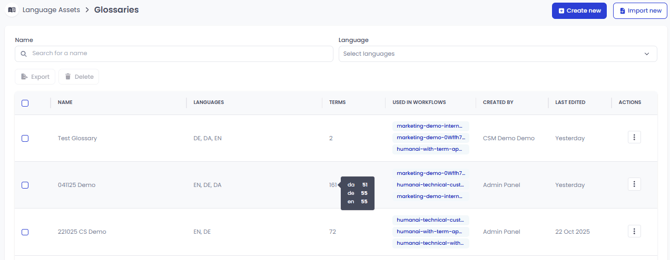
You can use the Name filter to find a specific glossary and the Language filter to search for a glossary containing a specific language. Each entry displays the most important information about that glossary: name, languages, number of terms, the specific workflow(s) the asset is connected to as well as creation and last edited dates. Hovering over the number of terms in a given glossary will reveal a per-language breakdown. Note that unlike a translation memory a glossary strictly speaking does not have a source and target language but is a collection of terms in two or more languages.
Creating a new glossary and importing existing glossary entries
 By clicking the Create new button in the upper right corner, you can set up a completely new glossary. If needed you can create multiple glossaries which can be useful if you would like to use separate versions for different purposes (for example technical vs. marketing content). Add the necessary information in the dialog box, make sure you activate it and click Save.
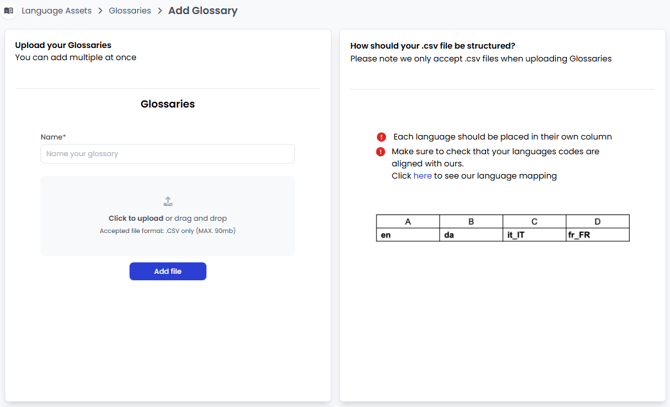
It is also possible to import a .csv file with already existing glossary entries by clicking the Import new button. A guide on how to structure the .csv file with all information needed is made available in the dialog box.
Good to know:
- It is not possible to upload term descriptions together with your glossary. Instead, please provide your AI training specialist with all relevant information during the HumanAI onboarding phase.
- Glossaries need to be connected to the workflow(s) you would like to use them with. Please reach out to your customer success manager or the support team via the website chat if you have any questions. Learn more about workflows and their setup HERE.
View and/or edit an existing glossary
To view and/or edit the content of a specific glossary click on the three dots on the right side. This will open a list with options to manage your asset:
Open: This option offers a range of editing possibilities to keep your glossaries up to date. You can also open this view by clicking on the glossary name. By default the glossary is arranged to show entries of all languages organized in separate rows. 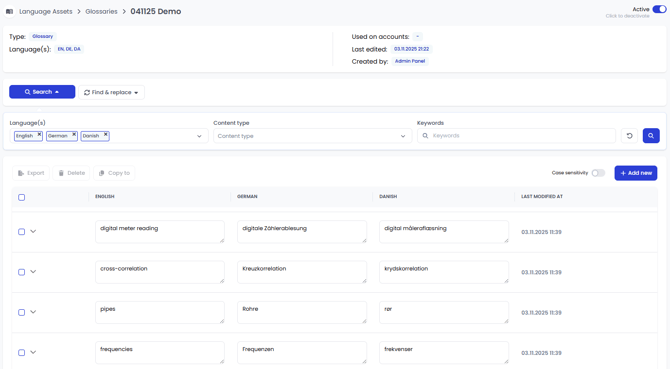
If you would like to display specific languages only, add them under Language(s) in the filter function and click on the search button on the right side. If you are using HumanAI you additionally have the possibility to distinguish between Human and Synthetic terms. Finally, you can search for specific terms using the Keywords field .
After applying the filters, make the desired changes. When you’re finished, click the cloud icon in the footer to save. The icon will turn green to confirm that your edits have been saved.
The editor offers the following options:
- Export specific terms: check one or more terms and click Export. Choose an email address you would like the export (.csv) to be sent to.
- Delete specific terms: check one or more terms and click Delete. Confirm the deletion in the dialog box
- Copy all or specific terms to a different glossary: check one or more segments, click on Copy to and choose the glossarie(s) you want to copy the terms to in the dialog box and confirm.
- Edit any given term: change the translation of a term in one or more languages
- Deactivate the glossary: temporarily deactivate the asset by toggling the switch in the upper right corner. The status will change to Inactive. This setting can be reverted at any time.
- Add new terms: clicking the button will open a dialog box. Fill in all requested information and save. The term is now added to the glossary in that specific language. To add the term in a further language click on the plus sign on the right side, fill in the required information in the dialog box and save. The term is now added and you can proceed with further languages as needed.
Good to know:
- New terms can also be added via the internal review editor while making edits to an existing translation. You can read more about how to use the feature HERE.

To access more information about a specific glossary entry click on the small arrow next to the tick box to expand the view:
- Metadata: this tab provides information about context as well as Entry & User Type of a term. The latter can be adjusted as needed by clicking on the respective option.
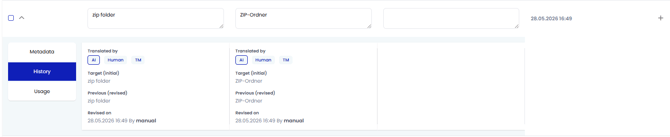
- History: This tab shows how a specific term was translated, for example whether it was translated by AI, by a human, or retrieved from the translation memory. If this information is not available, the system displays Undefined. It also shows when the segment was last revised and who made the changes.
- Usage: This tab shows the Project ID(s) of all projects in which the term was previously used. Projects are listed separately for each target language, so the lists may differ.

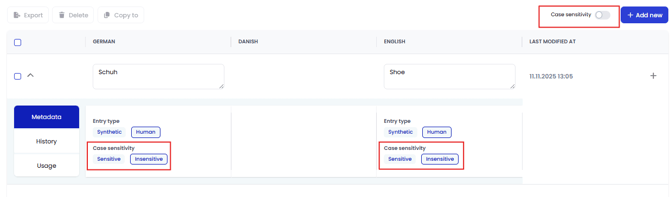
- Case sensitivity: The platform lets you define if terms should be case sensitive (=term is only applied if the term in the glossary and the term in text are absolutely identical) or case insensitive (term is applied regardless if the term in the glossary and the term in the text are absolutely identical, e.g. Apple and apple). This setting can be applied on a term level for a specific language or used as a global setting for the entire glossary.
In order to set the sensitivity on term level proceed to the metadata of the term you would like to define. Note that the setting for the same term in different languages can vary (i.e., a term in English can be sensitive while the same term in Danish is insensitive). The glossary is by default set to be case insensitive for all languages. You can bulk update this setting using the toggle on the top right. By doing so the entire glossary will be switched to be case sensitive.
Warning:
- Once you bulk update the glossaries any pre-defined term level settings are lost.
- Import: if you have more than just a couple of terms you want to add to your existing glossary you have the option to upload additional content via a .csv file, which needs to follow a specific format (see Creating a new glossary and importing existing glossary entries. Once your file is ready, upload it in the dialog box and click Confirm.
Good to know:
- if you upload duplicates to your translation memory or glossary, HumanAI will always use the most recently created version. If you have multiple terms with different translations depending on context, please reach out to your AI training specialist for assistance.
- Export: use this option to start the download of a glossary and have it sent to an email address of your choice
- Edit: use this option to edit the name or hide languages in a glossary. By removing a language it gets deactivated and hidden. This setting does not delete the glossary from the system and it is re-activated once the language is added again.
- Delete: use this option to delete the entire glossary from the account. Note that this action cannot be reversed and we recommend downloading a copy before proceeding.