What is the purpose of the Account Structure?
How do I invite a user to my account?
What is the purpose of the Account Structure?
EasyTranslate offers one account per customer, which acts as an umbrella account for all subaccounts. Subaccounts can represent different departments and/or stakeholders within your organisation. This account structure provides flexibility and allows you to align your account with your organisational structure. You can add as many subaccounts as you need within your main account. In addition, each account and subaccount have their own freelancer team, billing method, projects and price list, which are not shared across the accounts.
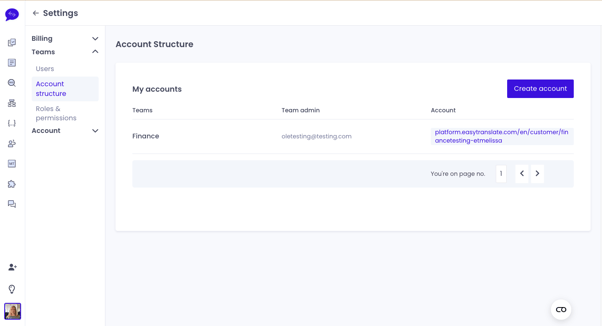
The account structure section, located in Settings > Teams > Account structure, allows you to create and get an overview of your structure design. Here, you can easily see your team names, the individuals in charge of each team, and the account associated with it. This provides a clear understanding of your organisational structure.
Please note: When you are added to a team, whether it is a customer account or sub-account, you are considered a User. You have the ability to customise settings and accesses for each Account, Sub-account and User under Settings > Team > Users.
How do I create a Subaccount?
To create a new subaccount, simply click on the Create Account button located at the top right corner. This will open a form where you can put in the necessary details.
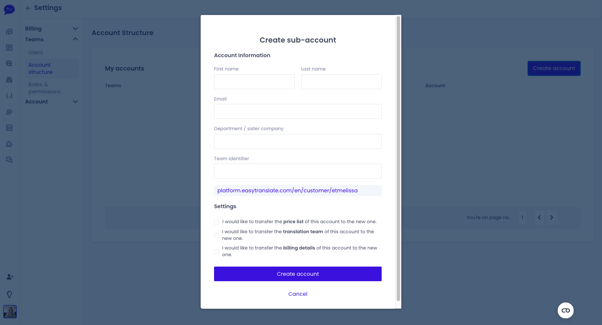
To create a new sub-account, you need to invite a user to be in charge of it. Here are the details required for creating a sub-account:
- First and last name: It has to be the first and last name of the user in charge of the subaccount.
- Email Address: The email address of the user you wish to invite.
- Department/Sister Company: This field will be the name of the subaccount. It must be unique and cannot have the same name as your main account or any other subaccounts.
- Team Identifier: This field must be unique and will be used to build the subdomain URL for the subaccount. For example, if a user with the company name Acme A/s creates a new account, their subdomain would be:
acme-as.platform.easytranslate.com. The team identifier value is a unique prefix to differentiate the created account from the sub-account. For instance, if the team identifier provided is "dk" or "marketing", the sub-accounts would be:
- dk-acme-as.platform.easytranslate.com
- Marketing-acme-as.platform.easytranslate.com
The team identifier can use lowercase letters, numbers, and dashes (-), but it cannot start or end with a dash (-).
After submitting the form, the invited user will receive an email invitation to complete their registration and access the sub-account platform. The sub-account creation will be finalised once the invited user sets up their account. You can check the invitation status in Settings > Teams > Roles & Permissions. The invited user becomes the team admin of the sub-account and can invite new users using the email invitation located in Settings > Account > Users & Permissions.
Please note: Sub-accounts cannot have sub-accounts.
How do I invite a user to my account?
To invite new users to your company platform, the team admin of an account or subaccount can click on the "invite new user" button located in Settings > Teams > Users by creating a sub-account. All you need is the email address of the user you want to invite.
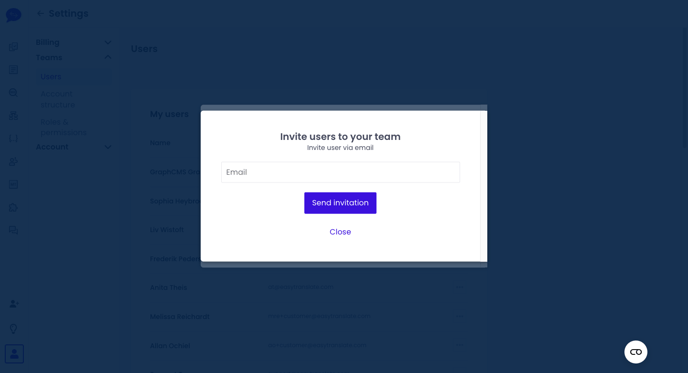
There are two different flows, depending on whether the email exists on the platform or not:
- The email already has a user linked to it and is invited to the platform
In this case, the flow is very simple. The only action that is required by the user is to accept the invitation. After that, they are set up and ready to use the account or subaccount.
- The email does not exist on the platform
After the email is received, the email owner will be redirected to a simple registration form to create a user account. When the form has been submitted successfully, the user will be able to use the account or subaccount.