Content
How roles and permissions support your setup
What roles and permissions are available on EasyTranslate
Where can I see the role and permission settings
What are custom roles and how are they configured
When and how to assign a custom role
How roles and permissions support your setup
The EasyTranslate platform offers flexible user role management to tailor the setup to your organizational needs. The system gives you the possibility to create roles with a highly customizable set of user permissions rather than being limited to generic configurations. The setup is scalable and as your team grows you can update settings per user, thereby keeping roles aligned with evolving workflows and changing functions and permission levels.
What roles and permissions are available on EasyTranslate
To define a user role the system lets you choose between more than 60 different permissions which are organized in 11 distinct categories.
|
Projects Approve Project Price Create Project Download Project Files Reassign task Submit Task Revision View Project Details View Task Revisions |
Folders Create Folder Delete Folder Update Folder View Folders |
Billing & Invoicing Add Billing Method Delete Billing Method Download Invoice Update Automation Price Limit Update Billing Details Update Billing Method View Billing Details View Billing Methods View Price Information View Price List |
|
Accounts & Sub-Accounts Create Sub-Account Delete Sub-Account Update Account Information Update Sub-Account View Account Information View Sub-Accounts |
Team & Roles Add Team Member Create Custom Team Role Remove Team Member Update Custom Team Role Update Team Member Update User Roles & Permissions View Team Members View User Roles & Permissions |
Freelancers View Added Freelancers View freelancer details |
|
Language Assets Create new glossary term Create translation assets Delete translation assets Update translation assets View translation assets |
Workflows Create workflow Delete workflow Update workflow Update workflow QA threshold View workflow |
Content Generation Create Content Generation Document Create Content Generation Template Delete Content Generation Document Delete Content Generation Template Update Content Generation Document Update Content Generation Template View Content Generation Documents View Content Generation Templates |
|
Webhooks & Integrations Create Webhook Endpoint Delete Webhook Endpoint Update Webhook Endpoint View OAuth Credentials View Webhook Endpoint |
Chat / Communication Join Chat Channel |
Where can I see the role and permission settings
To access the detailed overview go to Settings -> Teams -> Users and click on the three dots next to a name to see more options. Click on Roles & permissions to access a detailed overview.

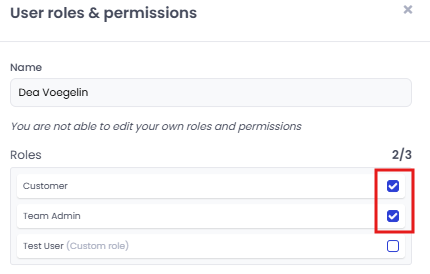
 You will be directed to the User roles & permissions overview which lists all the roles and permissions of a given user.
Name: This is the name of the user whose settings you are currently looking at.
Roles: This section lists both the default roles and any custom roles that were created additionally in the respective account (see HERE for details on how to create a custom role).
Permissions: There are more than 60 permissions to choose from and combine to define highly customized user roles (see HERE for a detailed list).
Good to know:
- Whether or not you can see the settings of other users depends on the role attributed to you.
- You are not able to edit your own role and permissions
- If you feel you are missing access to a feature or section talk to your team admin or contact us via the website support chat.
What are the default roles
The platform offers two default roles featuring a fixed set of pre-defined permissions:
Team Admin: This is an administrative/organizational role which lets a user set up and organize the account structure, manage team setups, roles as well as language assets and workflow configurations. It grants access to manage the billing setup and provides the permissions required to support integration flows.
Customer: This is an operational role providing the permissions necessary to run and oversee projects. This role gathers project management related permissions excluding any team admin permissions. It facilitates working with automation flows, language assets and gives full access to the content generation feature.
To access a detailed overview of all available roles and permissions please go to Settings -> Teams -> Users, click on the three dots and choose Roles & permissions.
Good to know:
- Although both default roles have pre-selected permissions which can’t be removed, additional permissions can be added to further fit specific needs.
- Combining both default roles will give a user the full set of permissions available on the platform.
How to assign a default role
Depending on how a user is onboarded to the platform one or both of the default roles get assigned.
Account/subaccount creation:
Any user that is creating an account or subaccount is automatically assigned both the Team Admin and Customer roles. This gives the user the full set of permissions available.
Invitation:
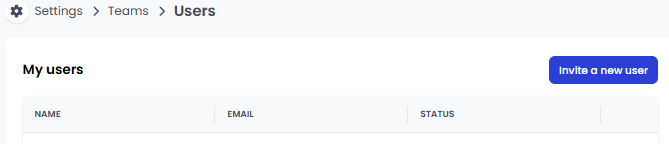
You can add as many colleagues as you would like to a given account or subaccount. To send out an invite click on Invite a new user in the top right corner.
This opens a dialog that offers a number of possibilities to invite users and assign one or both default roles.
Invitation to an existing account/subaccount:
a) Invite a user and give access to an account or subaccount:
 Add the new users email address and choose the account/subaccount you want to add them to from the dropdown. Click on Invite user to finalize the setup and send out the invitation for acceptance. The user will be assigned the default customer role.
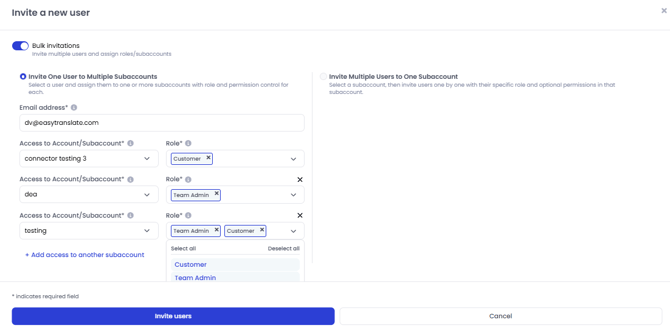
b) Invite a user to multiple subaccounts:
When you switch to Bulk invitations on the top left you have the option to choose Invite One User to Multiple Subaccounts on the left side of the dialog. This lets you assign a user to multiple subaccounts and assign them one or both default roles from the dropdown. The system lets you assign different user roles in each subaccount. Once done click on +Add access to another subaccount to add access to further subaccounts to the invite. Click on Invite users to send out an invitation email.
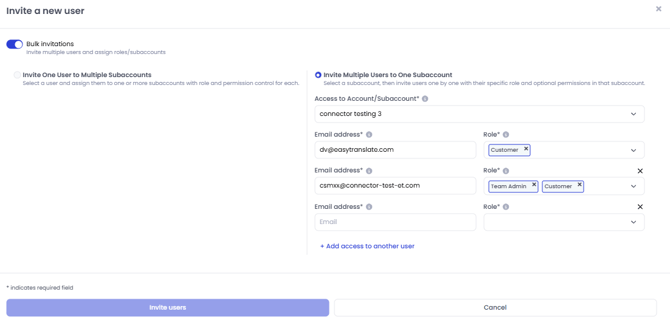
c) Invite multiple users to a subaccount:
When you switch to Bulk invitations on the top left you have the option to choose Invite Multiple Users to One Subaccount on the right side of the dialog. This lets you add multiple users to a subaccount at once and assign each of them a user role. You can choose one or both default roles from the dropdown. The system lets you assign different user roles for each user. Once done click on +Add access to another user to add the next user. Click on Invite users to send out an invitation email to all users.
d) Assign default role(s) to an existing user:
As a team admin you have the possibility to change the roles and permissions of an existing user. To do so go to Settings -> Teams -> Users and click on the three dots next to a name to see more options. Click on Roles & permissions to access a detailed overview. Here you can assign either one or both default roles to an existing user.
What are custom roles and how are they configured
Custom roles help you as a team admin to configure the access a user or user group has to the features and sections of your EasyTranslate account. The system lets you combine the available 60+ permissions to provide clearly defined user setups that support your team structure and follow the individual’s scope of work.
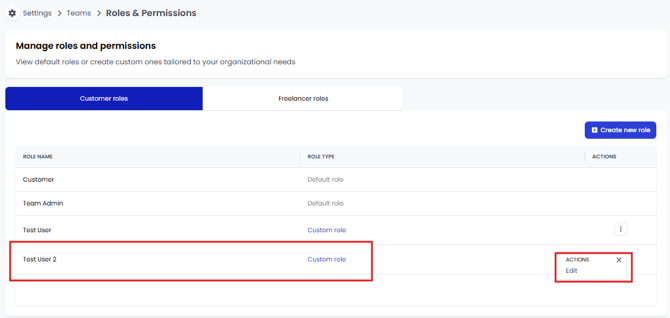
To configure a custom role go to Settings -> Teams -> Roles and Permissions which will take you to the Manage roles and permissions page. This page features two tabs, one to create custom roles and second one for the definition of freelancer roles.
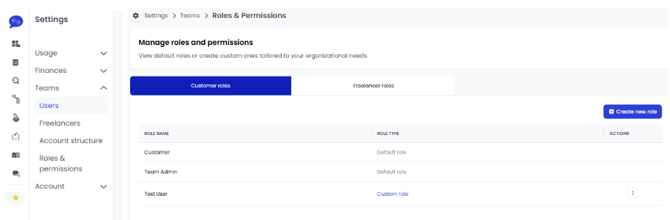
Custom roles tab:
 To get started click on Create new role on the right hand side. In the dialog under Name add a title that best describes the role. Add a description with further information about e.g., purpose and target group of the role in the Description field. Continue the configuration by adding permissions from one or several categories by setting a tick mark next to the permissions relevant for the respective role.
Once you have added all the required permissions click on Save to create the role. It will now be listed in the overview.
Good to know:
- The minimum permission a user needs to access the platform is View Account Information in the Accounts & Sub-Accounts category.
- If you need to make additional changes to the role, click the three dots and select Edit to return to the configuration dialog.
Freelancer roles tab:
This tab lists the different roles of freelancers assigned to your account. This is a view-only tab and the roles are configured by your AI training specialist.
When and how to assign a custom role
 Unlike the default roles, custom roles can’t be assigned when inviting a user. In case one or several users need to be assigned to a custom role, invite them to the platform as described HERE, then go to Settings -> Teams -> Users -> Edit -> Roles & permissions, remove the default role and add the custom role. This way you can assign each new user their intended role.
Good to know:
- Should you need support setting up the ideal custom role(s), please don’t hesitate to reach out to your customer success manager or contact us via the website support chat.