Content
Part 1
How to set up the connection
Overview
How to install the plugin
How to get your EasyTranslate account ready to connect
How to connect WordPress to EasyTranslate
How to keep the plugin updated
Part 2
How to translate your content
Overview
How to translate pages
How to translate strings
Where to update translations
Part 1
How to set up the connection
Overview
You can integrate your EasyTranslate account directly into your WordPress instance with our WordPress extension. The no-code plugin enables you to connect the two systems and translate your sites, blogs, stores and much more. The setup lets you synchronise and translate your content and pull it back into WordPress - a simple and easy way to organize your localisation workflows. In Part 1 we show you how to configure the connection between the two systems.
How to install the EasyTranslate plugin
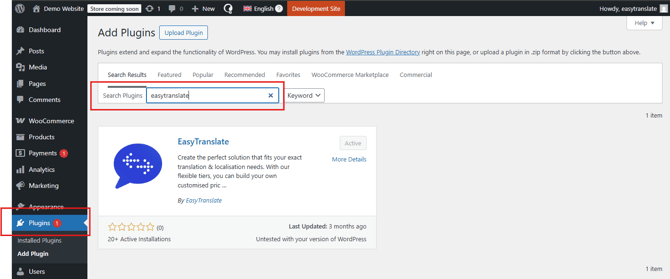
To install the EasyTranslate plugin log into WordPress and proceed to the Plugins tab in the menu bar on the left. Search for EasyTranslate and click on Install now to add and activate it.
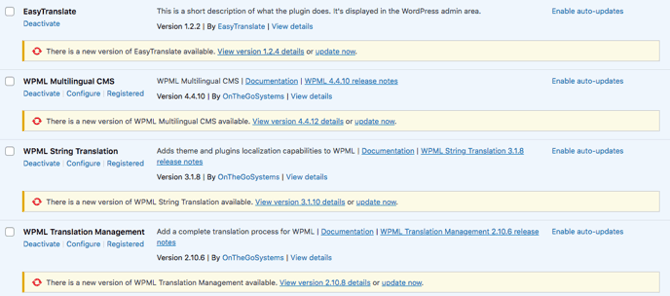
In order to use the EasyTranslate plugin, you also need to install the following apps:
- WPML Multilingual CMS
- WPML String Translation
- WPML Translation Management
Warning:
-
The EasyTranslate plugin relies heavily on WPML, so your strings must be WPML friendly. Their structure needs to be translation ready, i.e., written or registered in a way that WPML can detect, register, and translate properly. You otherwise risk that content won’t appear in WPML String translation and you consequently end up with mixed-language pages as not all content is available for localisation.
Once the WPML setup is complete, please proceed to adjust the following settings:
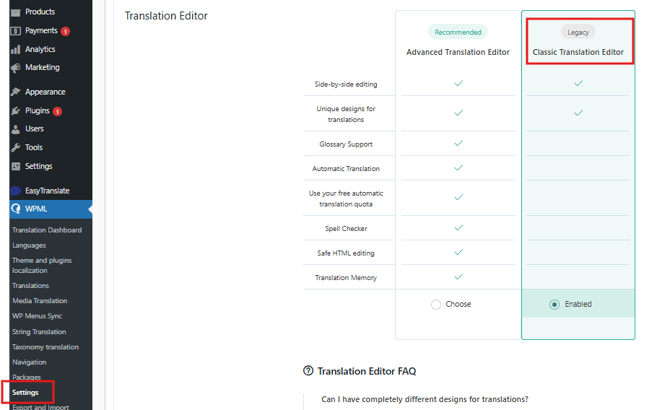
Translation Editor: Go to the WPML tab in the menu bar on the left, proceed to Settings and scroll to the Translation Editor section. Here make sure to activate the Classic Translation Editor.
How to get your EasyTranslate account ready to connect
On EasyTranslate your content will be organized either as individual projects or in a string library, depending on the content type. The translations are managed via dedicated and highly customizable workflows hosted on EasyTranslate. If you want to learn more about workflows, you can read about them HERE. In order to connect and start using the plugin with your WordPress instance, you will need to create a string library and automation workflows to support the localisation flow via the EasyTranslate String Library as well as the individual project upload. You can access the string library documentation HERE and read more about automation workflows HERE.
If you are using HumanAI, the workflow will be set up by your AI training specialist during the testing and validation phase. Feel free to contact your customer success manager or write to us via the website support chat if you have any questions.
How to connect WordPress to EasyTranslate
Follow the configuration steps below to establish the connection between WordPress and your EasyTranslate account:
1. In WordPress go to the EasyTranslate tab in the menu bar and proceed to Integration. On this page, the system asks you to provide access information to your EasyTranslate account. 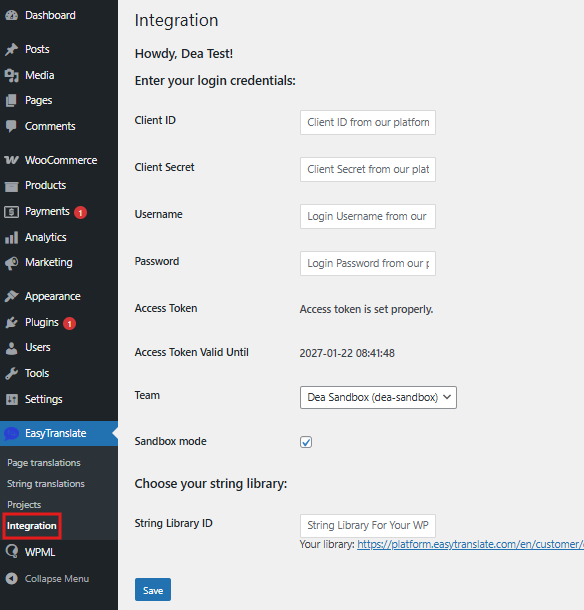
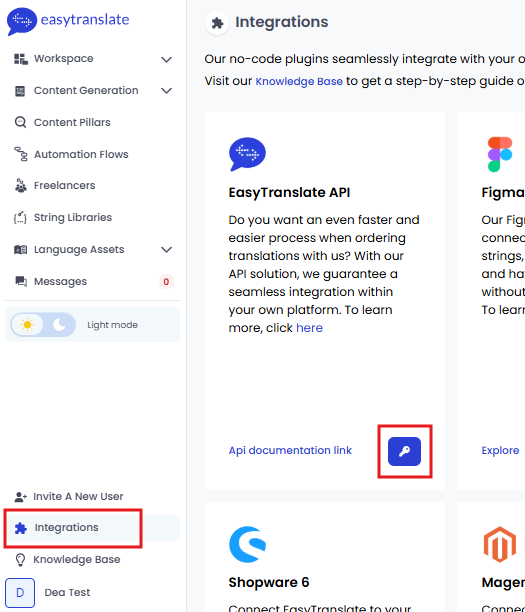
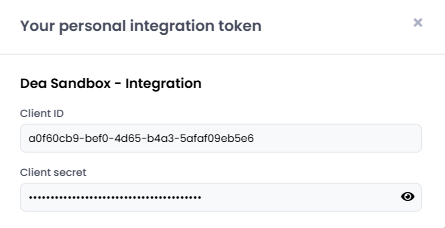
2. Proceed to your EasyTranslate account to find the requested information. EasyTranslate automatically generates the necessary API keys (Client ID, Client Secret) upon account creation. You can access the data in your EasyTranslate account under Integrations. Click on the key icon displayed under EasyTranslate API to reveal the requested keys.
4. In order to translate your strings using the EasyTranslate String Library you also need to add the String Library ID. In your EasyTranslate account go to the String Libraries section, open the string library you would like to use by clicking on the name and copy the ID from the browser URL.

Good to know:
- The credentials are account specific.
- If you are testing make sure you are in sandbox mode, both in the EasyTranslate WP plugin (set tick mark on the Integration page) and on EasyTranslate (dedicated sandbox account). Reach out to your customer success manager or write to us in the website support chat if you would like to test the plugin.
How to keep the plugin updated
Updates to a plugin may occur. In order for your setup to work properly, please make sure to keep the installed apps up-to-date at all times. Keep an eye out for updates on the plugin page and take action where needed.
Part 2
How to translate your content
Overview
 Once the connection between WordPress and EasyTranslate is established you are ready to start localizing your content. There are two different ways to sync and localize content hosted on WordPress. Page translations are triggered directly from within Wordpress as one-time projects, String translations are synched to and started either manually from within the EasyTranslate String Library or via the string library automation. In Part 2 we show you how content is sent back and forth and how to most efficiently organize and manage your translation setup using the EasyTranslate plugin for WordPress.
How to translate pages
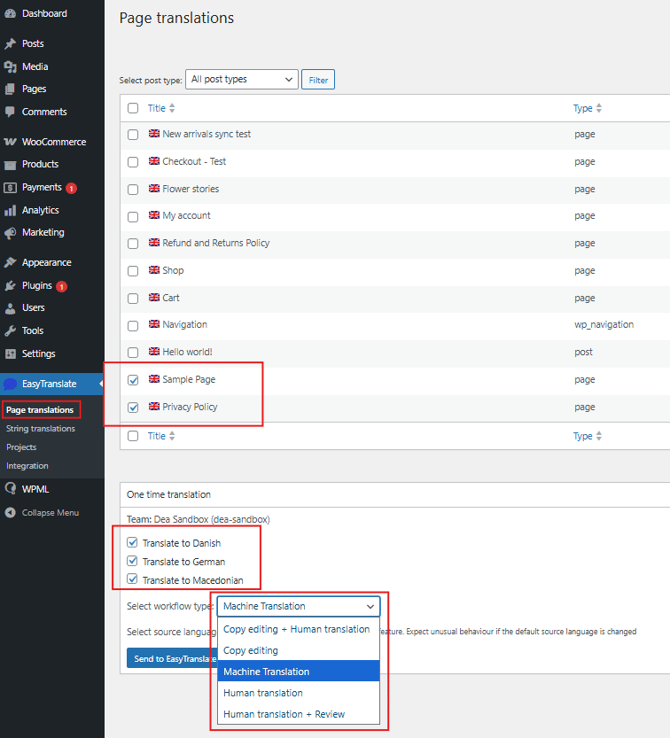
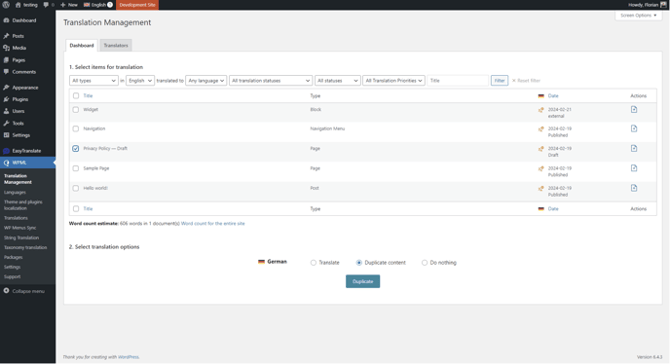
To send page content to EasyTranslate proceed to the EasyTranslate app in the menu on the left and select Page translations. Start out by selecting the page(s) you would like to send to translation.
- Check the box for each page you would like to translate. You can use the filtering option Select post type at the top to narrow down the search.
- Check the box for each language you want to translate into.
- Select the workflow you would like to use.
- Click Send to EasyTranslate.
Clicking on Send to EasyTranslate will trigger the project creation on EasyTranslate. You can choose to bundle several pages into one project by selecting and sending two or more pages at the same time or create separate projects by selecting and sending pages individually. Once the translation project is completed the translations will automatically be pulled back into WordPress.
Good to know:
-
Once the translation project is created you will be prompted to approve the price on EasyTranslate. The platform offers the possibility to set a price limit to automate project approval so you don’t have to log into your EasyTranslate account and accept the price. You can read more about the price limit filter HERE.
-
Warning:
WPML sometimes registers parts of the page content additionally as strings, i.e., the text is included in the Page translation section AND the String translations section. However, the text fragments which appear in the String translations section are not connected to their counterpart in the Page translations section and never pulled in to render page content. You should thus never localize these duplicates via String translations but uniquely via Page translations.

How to translate strings
To send string content to EasyTranslate proceed to the EasyTranslate app in the menu on the left and select String translations.
- Start out by selecting the string(s) you would like to send to translation. You can use the filtering options Select which strings to display (string status) and/or Select strings within domain at the top to narrow down the search. Click Filter to apply the selection.
- Check the boxes to select the string you would like to translate.
- Click Sync your strings to EasyTranslate.
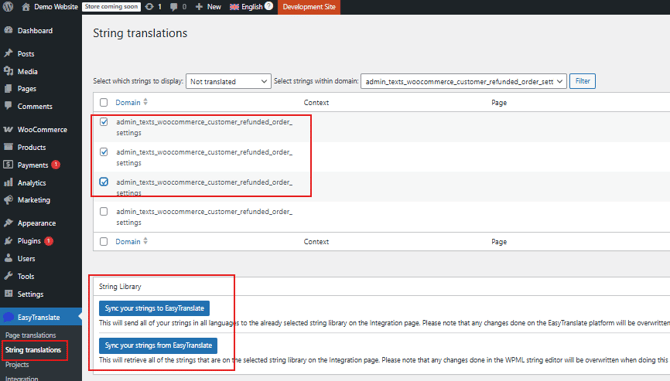
The Sync your strings to EasyTranslate action will transfer all selected strings from the WPML to the string library in your EasyTranslate account. Once the strings are created you need to start the translation either manually from within the EasyTranslate String Library. Alternatively you can set an automation threshold to enable automatic creation of string library translations. You will find the details on how to use the different automation options in our string library documentation HERE.
Finally, use the Sync your strings from EasyTranslate action to retrieve all translated strings from the EasyTranslate string library.
-
Warning:
If you sync content back and forth, existing strings will be overwritten in the respective system. Therefore, if you make changes to the source text in WordPress, make sure to delete the translation both in WordPress and on EasyTranslate before syncing the strings for re-translation, otherwise the translation will be synced along with the new source. You will consequently end up with a source-target mismatch and a new translation cannot be triggered in the string library because the language key is not empty.
Where to review translations
If you wish to review and change any of the translations we strongly recommend you exclusively work in the Internal Review Editor on EasyTranslate which you can access individually for each of your projects. Making the changes in the editor is the only way to implement the updates automatically across all relevant features. The amended translations are added automatically to your translation memory and glossary entries can be updated while editing. On top of that the string library gets updated which enables you to synchronise the edited translations back to WordPress. Finally, it ensures that your HumanAI models continuously learn from your input and preferences. You can find more info on how to access and use the Internal Review Editor HERE.