Connect to EasyTranslate through our Figma plugin, synchronise your content to a dedicated string library and translate your design copy into any language you need. Once the translations are completed, simply pull the localised text back into your Figma pages.
Content
How to get your EasyTranslate account ready
How to install and connect the Figma plugin
How to sync your content to EasyTranslate
How to pull translations back into Figma
Examples of different translation flows
How to get your EasyTranslate account ready
On EasyTranslate your content will be organised in a string library and translations are managed via a dedicated workflow. Hence, in order to start connecting and using the plugin you will need to create both a string library and an automation workflow in your EasyTranslate account. For more information please see our articles on the string library HERE, and the automation workflows HERE.
If you are using HumanAI, the workflow will be set up by your AI training specialist. Feel free to contact your customer success manager or contact us via the website support chat if you have any questions. If you want to know more about HumanAI, you can read about it HERE.
Good to know:
- Working with the Figma connector offers a number of possibilities and it is therefore important to map out your individual use case to find the best workflow. Please reach out to your customer success manager or contact our website support chat for more information and help.
How to install and connect the Figma Plugin
The EasyTranslate plugin is available in the Figma Marketplace. Simply click on Open in… to be redirected to your team library where you are prompted to run the installation.
Once installed you need to authenticate the plugin to be allowed to send information between EasyTranslate and Figma. To do so right click on your canvas and proceed to Plugins -> EasyTranslate. This opens a dialog where you are prompted to enter your Personal Access Token (PAT) which you can find in the EasyTranslate account you would like to connect to.
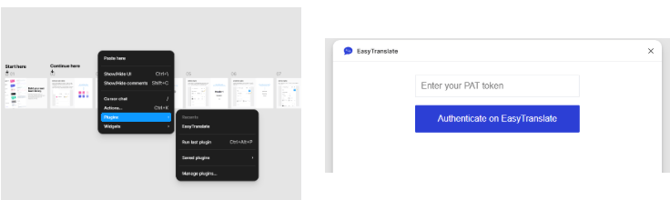
To retrieve it, log in to EasyTranslate, click on Integrations on the bottom left and find the Figma plugin in the selection. Click on the key icon to reveal the PAT and copy it. 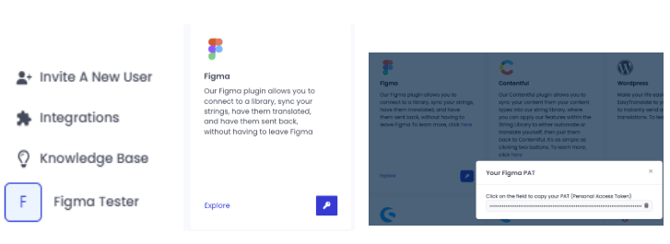
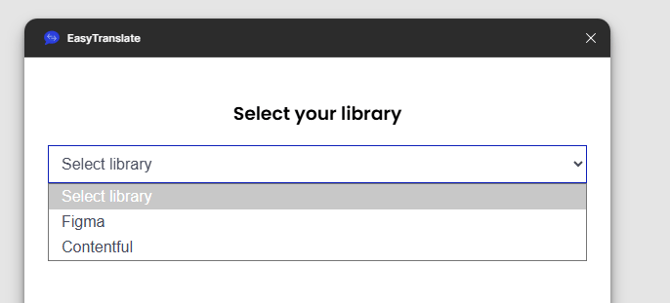
Once you insert the copied PAT in Figma you will be prompted to select the library you would like to send your content to. Click Confirm selection to connect to the library.
Good to know:
- You need to insert your PAT before every localisation session. We therefore suggest you leave the app window open as long as you are working on the translations of your design copy.
- The token is account specific. If you work with string libraries in multiple accounts you will need to make sure to activate the respective token before sending content back and forth.
- If you want to switch to a different library simply reopen the app and re-authenticate the connection with your PAT.
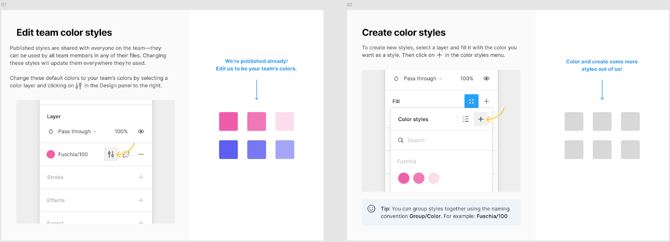
How to sync your content to EasyTranslate
Once the connection to the string library is active you have the possibility to either push all content from a given page or select specific text elements only. The system lets you create monolingual pages as well as multilingual designs, depending on how you choose to organise your copy in Figma.
Good to know:
- On EasyTranslate your design copy is arranged and managed in a string library and each text box created in Figma is stored and translated as a separate key.
- Each page has to be synced to a string library separately
Warning:
- Never push already translated content to your string library or you will end up with a source language mismatch.
Bulk sync text to your library from current page:
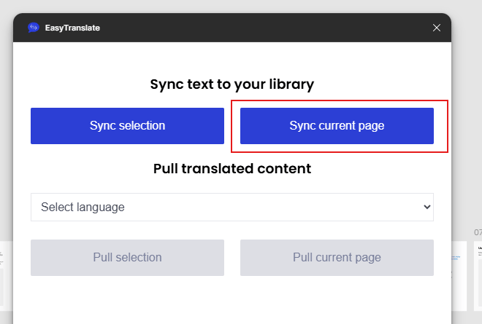
If you wish to translate all content on a given page, go to the page, open the app, connect with the PAT and choose Sync current page. This will send all content on this page to your string library.
This step does not require you to choose a target language. The target language will be defined in your string library when you start the translation automation. Please go to our string library documentation HERE to learn about the different possibilities to start translations. The section Part 2 - Translation and revision of EasyTranslate String Library entries provides all the necessary information on manual and automatic translation flow settings.
Warning:
- The sync functionality does not distinguish between locked and unlocked text segments on a given Figma page and will send all its content to EasyTranslate. If you wish to send specific content only please see HERE.
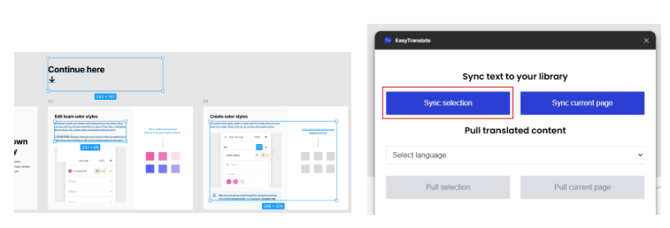
Sync select text from current page to the library:
Use this function if you wish to sync specific portions of text from a given page. This can be relevant if you are for example adding new content to an already translated page or you want to implement changes to an existing design copy. Select the text segments you would like to include in the push, open the app, connect and choose Sync selection. This will send the selected content to your string library.
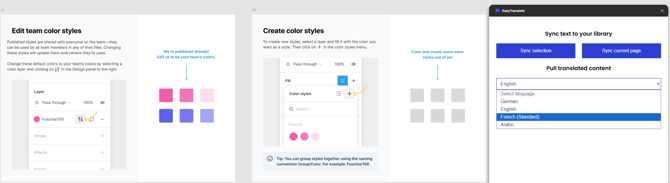
How to pull your translated content into Figma
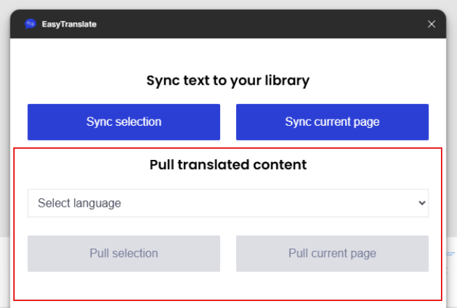
Once the translations are ready on EasyTranslate you can pull them back into your designs. To get started go to the Figma page you want to pull the content to. Open the app, authenticate with the PAT, choose the library that contains the translations and proceed to the Pull translated content section.
Pull text in bulk from EasyTranslate to your current page:
If you wish to pull all content to a given page make sure the app is connected. Choose the language you would like to pull into your designs. The system lets you choose between all available languages - both source and target. Clicking on Pull current page will overwrite the synchronised content on this page with translations in the chosen language. See an example HERE.
Pull select text from EasyTranslate to your current page:
Use this function if you wish to pull specific portions of text to a given page. This is relevant if you are adding new content to an existing page or are updating existing texts. On the respective page, select the text segments you would like to include in the pull, open the app and choose the language you would like to add. Finally, proceed by clicking Pull selection. This will pull the translation of all selected text fragments (=text in an individual text box in Figma) to your Figma page. See an example HERE.
Examples of different translation flows
Example 1: Translate all design copy on a given page into one or more languages using the bulk sync flow.
Step 1: Establish the connection with your EasyTranslate account and choose the string library.
Step 2: Make sure your page only contains your master copy that you want to translate into one or several languages.
Step 3: Bulk sync your text to your string library from the current page. You don't need to select any text to send it to EasyTranslate.
Step 4: Start the string library automation for one or more languages in your EasyTranslate account.
Step 5: Once the translations are done you can pull them back into Figma. This is done individually per language. Simply choose the language you want to populate your design with and click Pull current page. Make a copy of the translated version which you can place on the same page or anywhere else you want to work with it. Repeat this process with each localised version until you have a copy of all languages in Figma. Finalise by pulling the source language back into your master copy. You now have the copy available in all languages!
Good to know:
- The master copy is connected to your string library, the localised duplicates are not. We therefore suggest you keep a duplicate of all languages (source and target) as final versions and use the master copy if you wish to update the content. The duplicates can then be manually updated with new localised text. This is especially useful if you have already adjusted the layout of your translated versions.
Warning:
-
As soon as your page contains localised content, do no longer use the Sync current page function on this particular page. This would create duplicate strings in your string library with source language mismatches. If you need to add new text to your master copy please see HERE for guidelines on how to sync specific segments of text only.
Example 2: Update the master copy with new content added in separate text boxes using the Sync selection function.
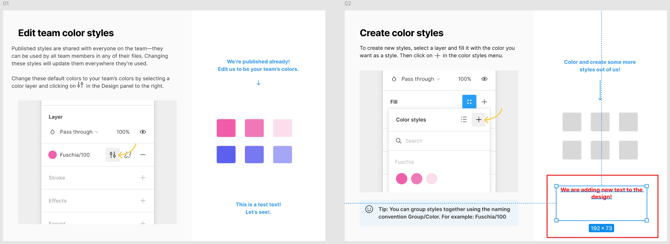
Step 1: Go to your master copy that is connected to the string library and add the new text box(es).
Step 2: Select the newly added text box(es) and choose Sync selection to send the added content to your string library.
Step 3: Start the string library automation for one or more languages in your EasyTranslate account.
Step 4: Use Pull selection to place all new translations in the master copy and from there transfer the newly localised content to the duplicates. Finalise by pulling the source language back into your master copy.
Good to know:
-
Each text box in Figma is converted into a key in your string library. We therefore recommend that you break up your source text into smaller text boxes in the master copy. This will facilitate the translation of modified or added new text.
Example 3: Update individual text boxes in the master copy using the Sync selection function.
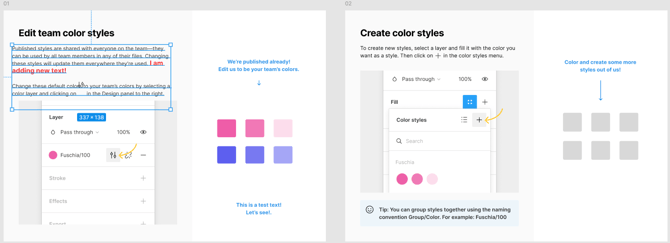
Step 1: Go to your master copy that is connected to the string library and update the text box(es) where needed.
Step 2: Go to your string library, search for the respective key(s) (=text box(es) in Figma) and delete the existing translations. This is necessary as you otherwise won't be able to re-start the automation and are left with a source and target content mismatch.
Step 2: Select the newly added text box(es) in Figma and choose Sync selection to update the key(s) in your string library.
Step 4: Start the string library automation for one or more languages in your EasyTranslate account.
Step 3: Use Pull selection to place all new translations in the master copy and from there transfer the newly localised content to the duplicates. Finalise by pulling the source language back into your master copy.
Good to know:
- Each text box in Figma is converted into a key in your string library. We therefore recommend that you break up your source text into smaller text boxes in the master copy. This will facilitate the translation of modified or added new text.
Warning:
- If you make adjustments to a text box and re-send it for translation make sure to delete the existing translations in the string library. Otherwise the automation will not start and you end with a source and target language mismatch.
Where to review translations
You should never make changes to your translations in Figma. If you wish to review and change any of the translations we strongly advise you to exclusively work in the internal review editor which you can access individually for each of your projects in your EasyTranslate account. Making the changes in the editor is the only way to implement the updates automatically across all relevant features. The amended translations are added automatically to your translation memory and glossary entries can be updated while editing. On top of that the string library gets updated which enables you to pull the updated translations back to Figma. Finally, it ensures that your HumanAI models continuously learn from your input and preferences. You can find more info on how to access and use the internal review editor HERE.